Connect Data
Before you can start running analytical queries on the data stored in a database, you have to connect the database to your workspace in GoodData Cloud Native (GoodData.CN).
You can choose what database to connect:
The pre-installed database with the sample data that is prepared in the GoodData.CN Community Edition image
This data is later used in the tutorial about working with a logical data model and tutorial about working with dashboards.
Analytical queries often need a different structure of data than application databases do to perform well. For more information, review the performance tips for the supported databases.
Connect the Pre-installed Database
The GoodData.CN Community Edition image contains the sample data in a PostgreSQL database. The data represents a simple scenario of an e-commerce system that tracks customers, how they order certain products, and how much money was spent on various marketing campaigns in different campaign channels.
The data has the following physical schema of tables and their relationships:
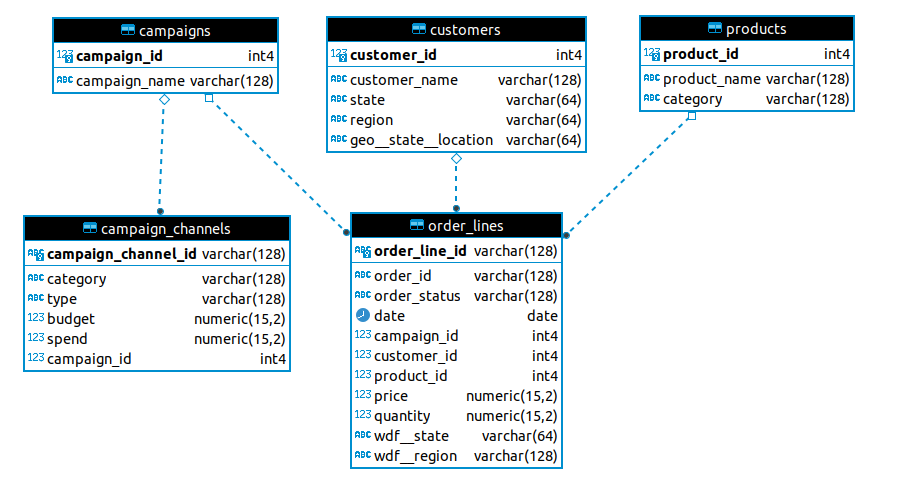
For more information, see how the demo data is organized.
Steps:
Open the
demoworkspace.You are prompted to connect the database with the demo data.
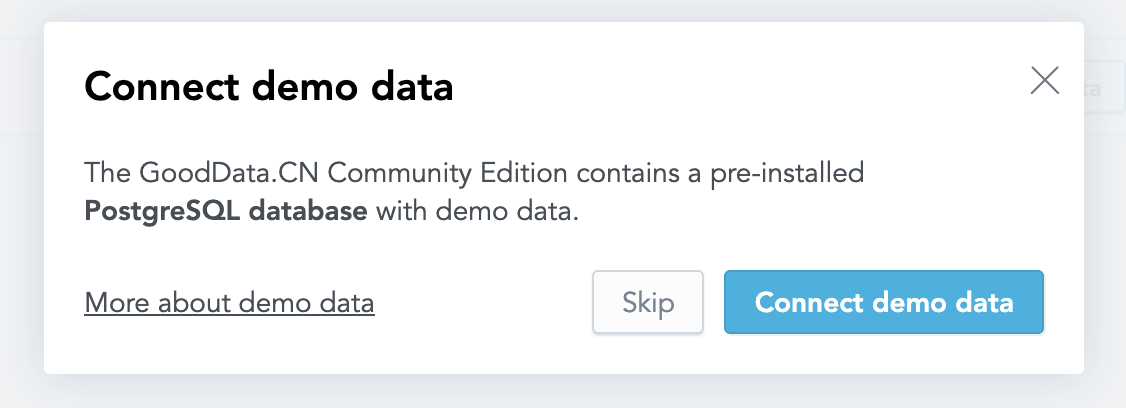
Click Connect demo data.
The database with the sample data is connected to the workspace and is registered as a data source called
demo-ds.You are redirected to the LDM Modeler where you can continue with building a logical data model.
Connect Your Own Database
To connect your own database (or to connect the database with the sample data if you have already connected another database to the workspace), use the API. For each database, you have to do it only once. After a database is connected, you can then reuse it in multiple workspaces.
To connect your own database, review the list of supported databases and how to configure parameters of your database (for example, how to set up a JDBC URL). Update the command syntax according to the database configuration.
In your terminal application, run the following command, which will connect the database with the demo data:
curl http://localhost:3000/api/entities/dataSources \
  -H "Content-Type: application/vnd.gooddata.api+json" \
  -H "Accept: application/vnd.gooddata.api+json" \
  -H "Authorization: Bearer YWRtaW46Ym9vdHN0cmFwOmFkbWluMTIz" \
  -X POST \
  -d '{
      "data": {
          "attributes": {
              "name": "demo-ds",
              "url": "jdbc:postgresql://localhost:5432/demo",
              "schema": "demo",
              "type": "POSTGRESQL",
              "username": "demouser",
              "password": "demopass"
          },
          "id": "demo-ds",
          "type": "dataSource"
      }
  }' | jq .
Invoke-RestMethod -Method Post -Uri 'http://localhost:3000/api/entities/dataSources' `
  -ContentType 'application/vnd.gooddata.api+json' `
  -H @{
    'Accept' = 'application/vnd.gooddata.api+json'
    'Authorization' = 'Bearer YWRtaW46Ym9vdHN0cmFwOmFkbWluMTIz'
  } `
  -Body '{
      "data": {
          "attributes": {
              "name": "demo-ds",
              "url": "jdbc:postgresql://localhost:5432/demo",
              "schema": "demo",
              "type": "POSTGRESQL",
              "username": "demouser",
              "password": "demopass"
          },
          "id": "demo-ds",
          "type": "dataSource"
      }
  }' | ConvertTo-Json
To confirm that the database with the sample data has been connected (and has been registered as a data source called demo-ds), the server returns the following response:
{
  "data": {
    "id": "demo-ds",
    "type": "dataSource",
    "attributes": {
      "name": "demo-ds",
      "type": "POSTGRESQL",
      "url": "jdbc:postgresql://localhost:5432/demo",
      "schema": "demo",
      "username": "demouser"
    }
  },
  "links": {
    "self": "http://localhost:3000/api/entities/dataSources/demo-ds"
  }
}
You can now continue with building a logical data model.