Create a Physical Data Model
Once you have created data sources for your database, generate a physical data model (PDM).
The PDM describes the tables of your database and represents how the actual data is organized and stored in the database. The logical data model (LDM) is then mapped to the PDM and ultimately determines your analytical options when you build visualizations and dashboards.
To generate a PDM, follow these steps:
Consider following our recommended naming conventions in your database
Generate a PDM in the LDM modeler or using the API
Check the Data Types In Your Database
Make sure that the columns that you want to include in the PDM have the supported data types assigned. The data types are validated using the JDBC data types. To find out how the JDBC data types are mapped to the data types in your database, see the documentation for your database.
The following JDBC data types are supported:
BIGINTBITBOOLEANCHARCLOBDATEDECIMALDOUBLEFLOATINTEGERLONGNVARCHARLONGVARCHARNCHARNCLOBNUMERICNVARCHARREALROWIDSMALLINTSQLXMLSTRINGTIMESTAMP_WITH_TIMEZONETIMESTAMPTINYINTVARCHAR
Columns with an unsupported data type (for example, when the UUID database data type is mapped to the OTHER JDBC data type) are skipped and not included in the PDM. You will get the following warning during the generation of the PDM:
Column <column_name>
Data type <data_type> of column is not supported
Recommended Naming Conventions In Your Database
You do not need to follow a specific database naming conventions to be able to connect your data and create physical and logical data models. However implementing the following naming conventions to name objects in your database is going to make the process of creating the physical and logical data models much easier:
| Entity | Name Format | Example |
|---|---|---|
| Table | tablePrefix__baseName | gd_table__customer |
| View | viewPrefix__baseName | gd_view__customer |
| Label | labelPrefix__attributeBaseName__labelBaseName | ls__country_id__country_name |
| Fact | factPrefix__baseName | f__sales_amount |
| Grain | grainPrefix__baseName | gr__id_customer_pk |
| Reference | referencePrefix__tableBaseName__referenceBaseName | r__customer__surname |
| Workspace Data Filter | wdfPrefix__baseName | wdf__region |
Make note of the following:
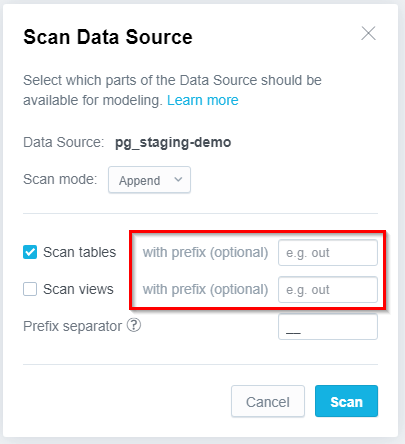
Table and View entities must follow the naming conventions if you want to make use of the optional feature of filtering which tables and views you want to filter. Note that if you do not define any prefixes in the Scan Data Source dialog, all tables and/or views will be imported.
Ensuring that Label, Fact, Grain and Reference entities follow the recommended naming conventions should save you from having to do additional configuration when creating the logical data model.
Workspace Data Filteris used to filter data in workspaces. To learn more, go to Workspace Data Filters. Attributes and labels are not generated for columns that have been filtered using the workspace data filter.The prefixes (
tablePrefix,labelPrefix, and so on) are not case-sensitive.
Separators
In the table above, a double underscore (__) is used as a separator between prefixes and entity names, or between separate sections of reference names and label names. Note that in an API request for generating the LDM, you can define any string as a separator.
We recommend that the string you want to use as a separator be as unique as possible. Consider the situation when you use an underscore (_) as a separator and you have a column named referencePrefix_table_1_fk_column. This column name cannot be split into three sections as it would be required (prefix, referencedTable, referencedColumn).
Naming Conventions vs. Referential Integrity
Do not apply the naming conventions to the columns that are used as or are included in a primary key or a foreign key in your database. Such columns will be interpreted as grains and references based on referential integrity (see Default Configuration).