Set Up Azure Resources
This section guides you through setting up the essential Azure resources required for your GoodData.CN deployment. You will create resource groups, virtual networks, a PostgreSQL database, and an Azure Kubernetes Service (AKS) cluster, forming the foundation of your GoodData.CN environment.
Choose Azure Location
Choose a location close to your region of operations to ensure optimal network performance.
Keep in mind that the location you choose also determines which server hardware and services are available to you:
- Server Configuration Compatibility: In this guide we go on to create a PostgreSQL database and a Kubernetes cluster using the
Standard_D2ds_v4andStandard_D4as_v4server configurations. These configurations might not be available in all regions. You can use different configurations, however we recommend selecting options within the General Purpose tier, rather than the Burstable tier, to ensure better performance and stability. - vCPU Availability: Ensure that the region you select supports at least 12 vCPUs to accommodate the setup of your Kubernetes cluster. If your chosen region does not meet this requirement, you may need to contact Microsoft to request an increase in the vCPU limits.
To view all supported locations, use the following command:
az account list-locations
Also see Azure’s My quotas page to check the vCPU quotas set for a particular region.
Deploy Azure Resources
Start by setting up Azure resources:
- Azure resource group
- Virtual network
- PostgreSQL server
- AKS cluster
Steps:
Create a resource group:
az group create --name $AZ_RESOURCE_GROUP \
  --location $AZ_LOCATION
Abandoning the Installation
If at some point you want to abandon your installation and start over, simply delete the Azure resource group and start from scratch using:
az group delete --name $AZ_RESOURCE_GROUPCreate a virtual network (VNet) to be to used by your PostgreSQL database:
az network vnet create --name $PG_VNET \
  --resource-group $AZ_RESOURCE_GROUP \
  --location $AZ_LOCATION \
  --address-prefixes 10.0.0.0/16 \
  --subnet-name $PG_SUBNET \
  --subnet-prefix 10.0.0.0/24
Get the subnet ID:
PG_SUBNET_ID=$(
  az network vnet subnet show \
  --resource-group $AZ_RESOURCE_GROUP \
  --vnet-name $PG_VNET \
  --name $PG_SUBNET \
  --query "id" -o tsv
)

echo "PG_SUBNET_ID=$PG_SUBNET_ID"
Create a PostgreSQL server:
az postgres flexible-server create \
  --resource-group $AZ_RESOURCE_GROUP --name $PG_NAME \
  --location $AZ_LOCATION --version 16 \
  --admin-user $PG_ADMIN_NAME \
  --admin-password $PG_ADMIN_PASSWORD \
  --sku-name Standard_D2ds_v4 --storage-size 32 \
  --high-availability ZoneRedundant --subnet $PG_SUBNET_ID
Enable the PostgreSQL extension pg_trgm:
az postgres flexible-server parameter \
  set --resource-group $AZ_RESOURCE_GROUP  \
  --server-name $PG_NAME \
  --name azure.extensions --value pg_trgm
Create an Kubernetes (AKS) cluster:
az aks create -g $AZ_RESOURCE_GROUP \
  -n $AZ_AKS --location $AZ_LOCATION \
  --node-resource-group $AZ_AKS_NODE_RESOURCE_GROUP \
  --generate-ssh-keys --min-count 1 --max-count 6 \
  --enable-blob-driver --enable-cluster-autoscaler \
  --enable-workload-identity --enable-oidc-issuer \
  --node-vm-size Standard_D4as_v4 --node-osdisk-size 100 \
  --outbound-type managedNATGateway --zones 1 2 3
Configure kubectl to connect to your Kubernetes cluster:
az aks get-credentials --resource-group $AZ_RESOURCE_GROUP \
  --name $AZ_AKS
Link AKS and PostgreSQL
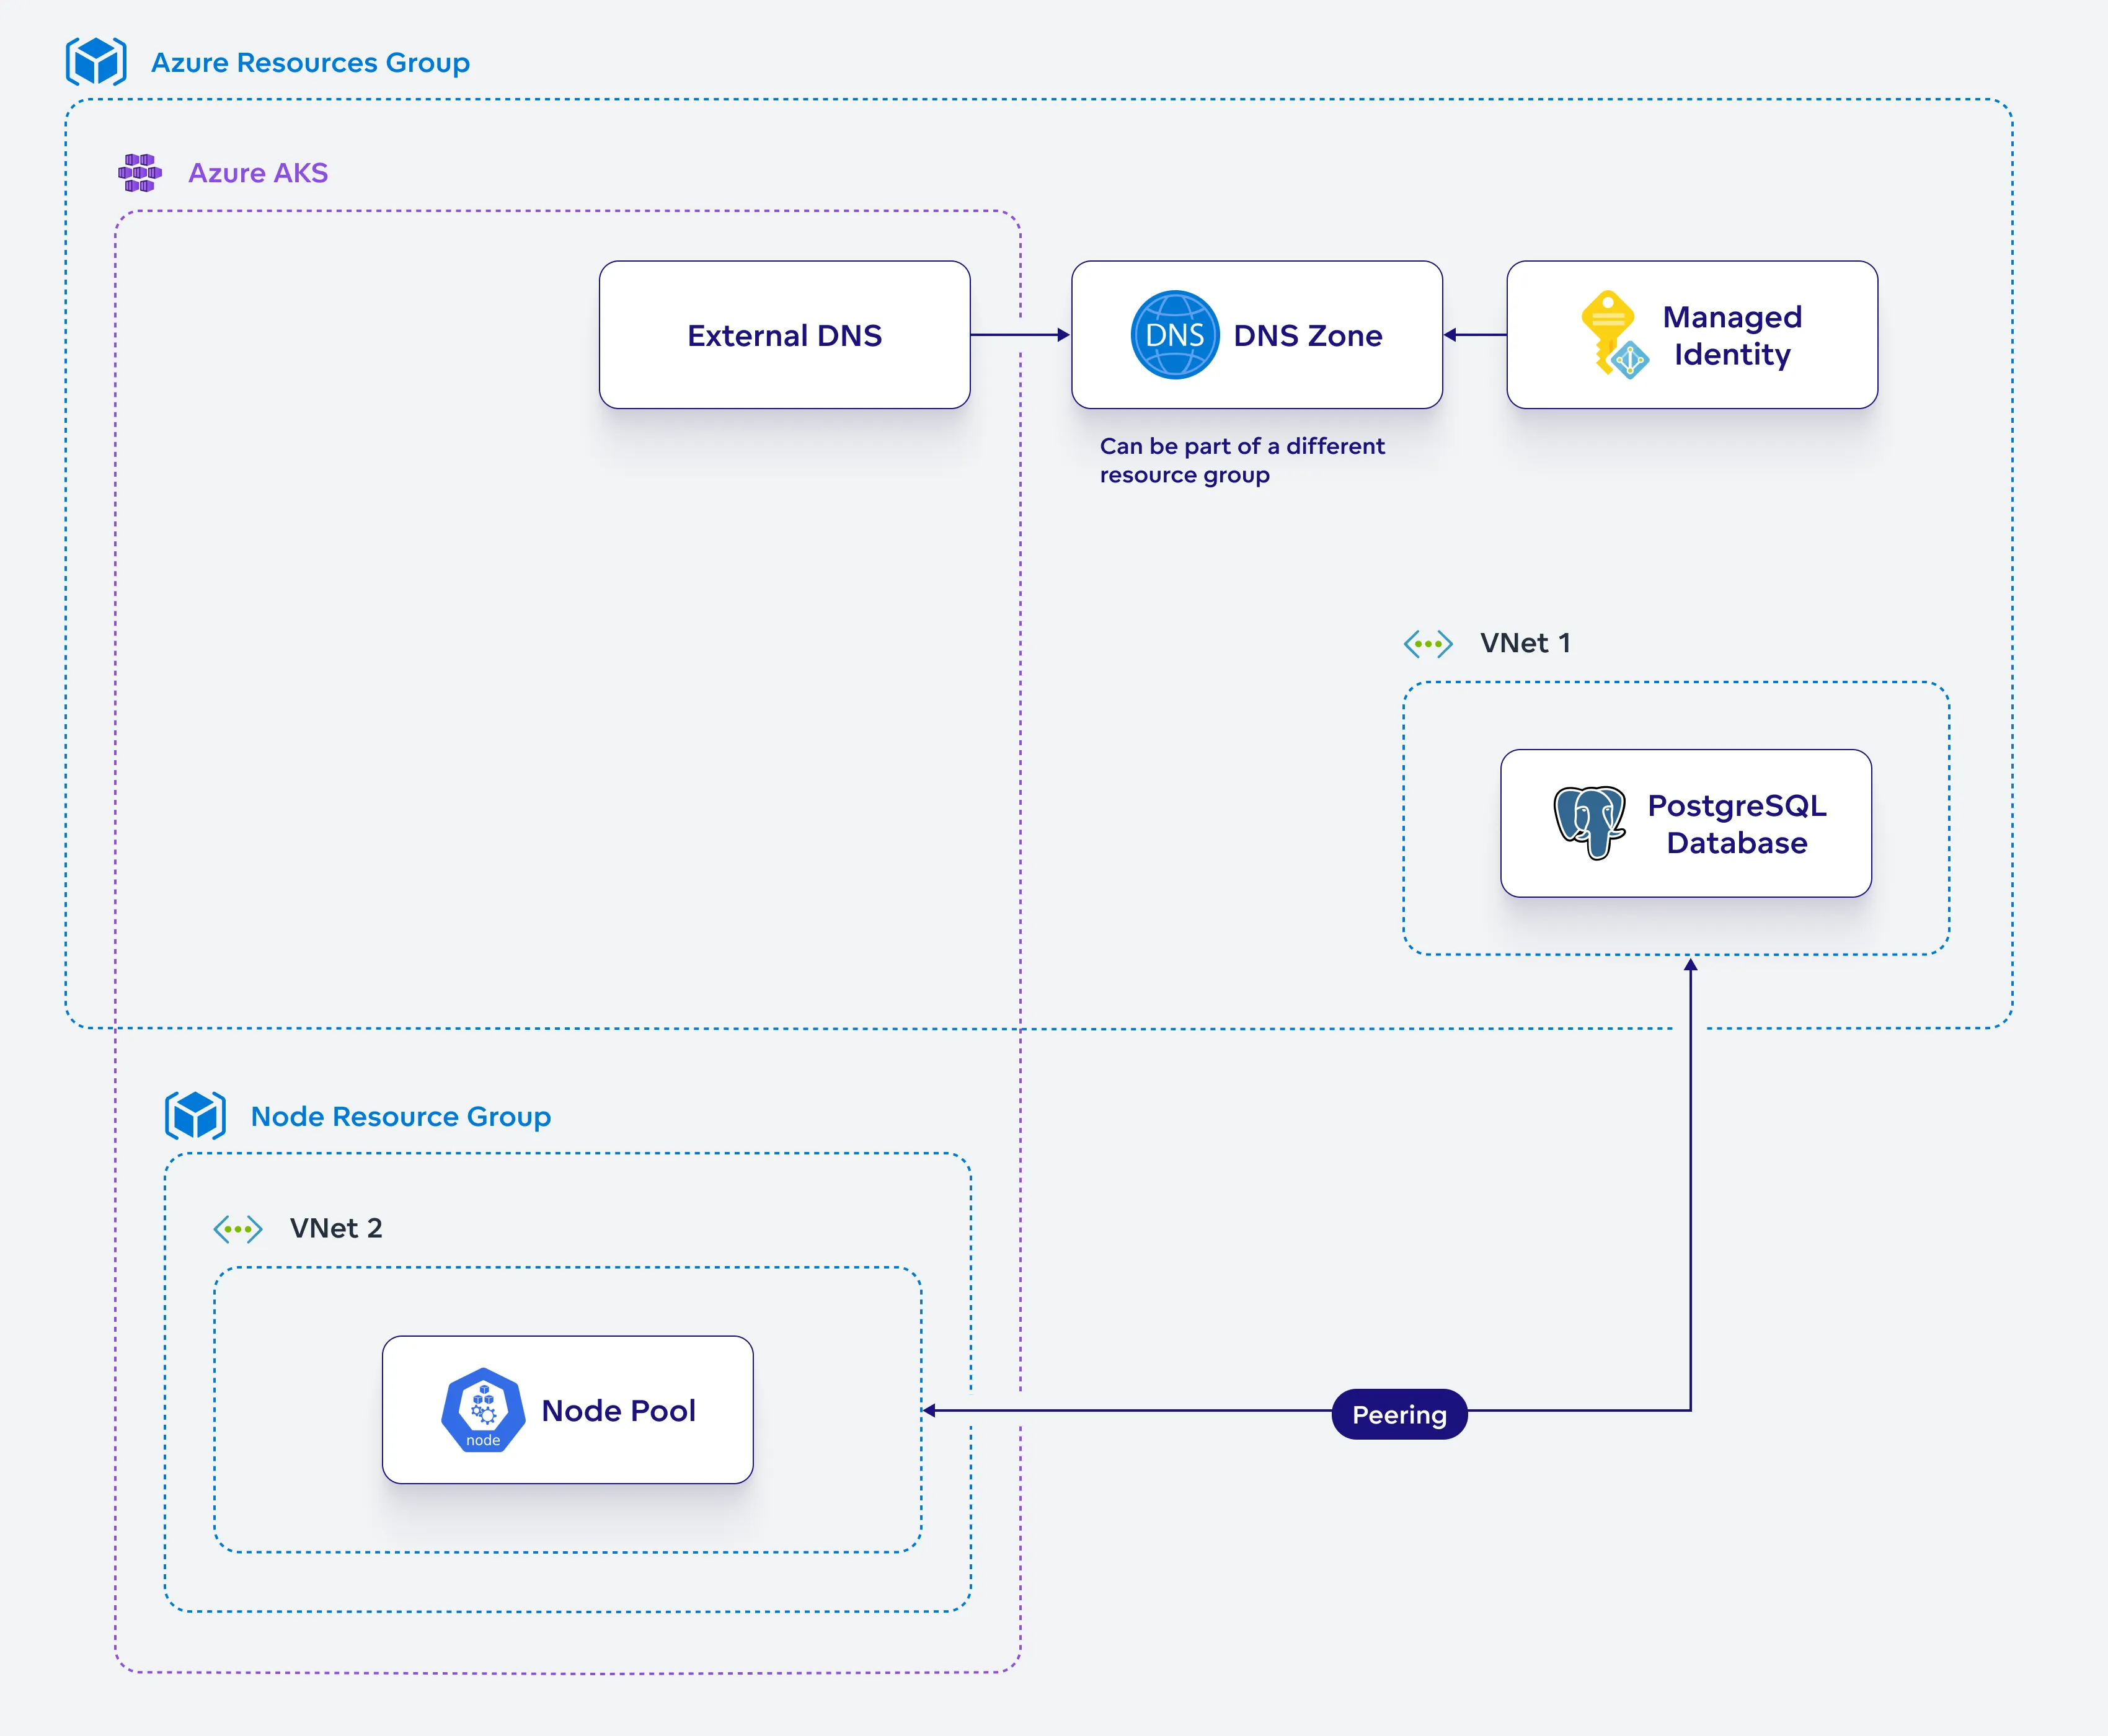
When an AKS cluster is created, Azure automatically generates a secondary resource group, known as the node resource group, to manage the cluster’s infrastructure resources like VMs, load balancers, managed disks, and networking components. Azure also creates a separate virtual network for these resources.
To enable secure communication between the AKS cluster and the PostgreSQL database, you need to create a link between the AKS and the PostgreSQL private DNS.
Steps:
Get name of the VNet where AKS nodes reside:
AZ_AKS_NODE_VNET=$(az network vnet list \
  --resource-group $AZ_AKS_NODE_RESOURCE_GROUP \
  --query '[].name' -o tsv)

echo "AZ_AKS_NODE_VNET=$AZ_AKS_NODE_VNET"
Get ID of the VNet where AKS nodes reside:
AZ_AKS_NODE_VNET_ID=$(az network vnet show \
  --resource-group $AZ_AKS_NODE_RESOURCE_GROUP \
  --name $AZ_AKS_NODE_VNET --query 'id' -o tsv)

echo "AZ_AKS_NODE_VNET_ID=$AZ_AKS_NODE_VNET_ID"
Get ID of the VNet where PostgreSQL resides:
PG_VNET_ID=$(az network vnet show --resource-group $AZ_RESOURCE_GROUP \
--name $PG_VNET --query 'id' -o tsv)

echo "PG_VNET_ID=$PG_VNET_ID"
Peer AKS VNet to PostgreSQL VNet:
az network vnet peering create \
  --name AKS-to-Postgres \
  --resource-group $AZ_AKS_NODE_RESOURCE_GROUP \
  --vnet-name $AZ_AKS_NODE_VNET \
  --remote-vnet $PG_VNET_ID \
  --allow-vnet-access
Peer PostgreSQL VNet to AKS VNet
az network vnet peering create \
  --name Postgres-to-AKS \
  --resource-group $AZ_RESOURCE_GROUP \
  --vnet-name $PG_VNET \
  --remote-vnet $AZ_AKS_NODE_VNET_ID \
  --allow-vnet-access
Create a VNet link:
az network private-dns link vnet create \
  -g $AZ_RESOURCE_GROUP -n aks-db-link \
  -z $PG_NAME.private.postgres.database.azure.com \
  -v $AZ_AKS_NODE_VNET_ID -e false
(Optional) Create a DNS Zone
If you are already using a DNS zone in another resource group, ensure that you correctly reference it in your $DNS_RESOURCE_GROUP variable and skip this step—proceed directly to Set Up ExternalDNS.
If you want to create a new DNS zone within the current Azure resource group, follow these steps. In this case, ensure that your $DNS_RESOURCE_GROUP is the same as your $AZ_RESOURCE_GROUP.
Steps:
Create a public DNS zone:
az network dns zone create --resource-group $AZ_RESOURCE_GROUP \
  --name $DNS_ZONE
Retrieve the nameservers assigned to your DNS zone:
az network dns zone show --resource-group $AZ_RESOURCE_GROUP \
  --name $DNS_ZONE --query "nameServers" -o tsv
Update your domain’s nameservers:
In your domain management system, switch to custom DNS and enter the Azure DNS nameservers you retrieved in the previous step. Note that this change may take up to 48 hours to propagate.
Use a DNS lookup tool to check if your domain’s nameservers have been updated to the Azure DNS nameservers and if it propagated:
dig NS $DNS_ZONE
dig @8.8.8.8 NS $DNS_ZONE
dig @1.1.1.1 NS $DNS_ZONE
dig @9.9.9.9 NS $DNS_ZONE
Set Up ExternalDNS
ExternalDNS synchronizes exposed Kubernetes Services and Ingresses with DNS providers.
Steps
Retrieve the AKS OIDC Issuer URL:
export AKS_OIDC_ISSUER="$(az aks show \
  -n "${AZ_AKS}" \
  -g "${AZ_RESOURCE_GROUP}" \
  --query "oidcIssuerProfile.issuerUrl" -otsv)"

echo "AKS_OIDC_ISSUER=$AKS_OIDC_ISSUER"
Retrieve your Azure subscription and tenant IDs:
export SUBSCRIPTION_ID="$(az account show --query id --output tsv)"
export TENANT_ID="$(az account show --query tenantId -o tsv)"

echo "SUBSCRIPTION_ID=$SUBSCRIPTION_ID"
echo "TENANT_ID=$TENANT_ID"
Create a managed identity:
az identity create --name $USER_ASSIGNED_IDENTITY_NAME \
  --resource-group $AZ_RESOURCE_GROUP \
  --location $AZ_LOCATION \
  --subscription $SUBSCRIPTION_ID
Retrieve the managed identity client ID:
export USER_ASSIGNED_CLIENT_ID="$(az identity show \
  --resource-group "${AZ_RESOURCE_GROUP}" \
  --name $USER_ASSIGNED_IDENTITY_NAME \
  --query 'clientId' -otsv)"

echo "USER_ASSIGNED_CLIENT_ID=$USER_ASSIGNED_CLIENT_ID"
Establish a federated identity credential - link the managed identity with the AKS OIDC issuer and the specified Kubernetes service account:
az identity federated-credential create \
  --name $FEDERATED_IDENTITY_CREDENTIAL_NAME \
  --identity-name $USER_ASSIGNED_IDENTITY_NAME \
  --resource-group $AZ_RESOURCE_GROUP --issuer $AKS_OIDC_ISSUER \
  --subject system:serviceaccount:$SERVICE_ACCOUNT_NAMESPACE:$SERVICE_ACCOUNT_NAME \
  --audience api://AzureADTokenExchange
Retrieve DNS ID and resource group ID:
export DNS_ID=$(az network dns zone show \
  --name $DNS_ZONE \
  --resource-group "${AZ_RESOURCE_GROUP}" \
  --query "id" --output tsv)
export RESOURCE_GROUP_ID=$(az group show \
  --name "${DNS_RESOURCE_GROUP}" \
  --query "id" --output tsv)

echo "DNS_ID=$DNS_ID"
echo "RESOURCE_GROUP_ID=$RESOURCE_GROUP_ID"
These IDs are used to grant access to the managed identity.
Assign roles to the managed identity:
az role assignment create --role "DNS Zone Contributor" \
  --assignee $USER_ASSIGNED_CLIENT_ID --scope $DNS_ID
az role assignment create --role "Reader" \
  --assignee $USER_ASSIGNED_CLIENT_ID --scope $RESOURCE_GROUP_ID
Lack of Permission?
If you lack permission to query the Graph API, find your assignee object ID:
ASSIGNEE_OBJECT_ID=$(az identity show \
  --name $USER_ASSIGNED_IDENTITY_NAME \
  --resource-group $AZ_RESOURCE_GROUP \
  --query principalId --output tsv)

echo "ASSIGNEE_OBJECT_ID=$ASSIGNEE_OBJECT_ID"
In both of the commands replace
--assignee $USER_ASSIGNED_CLIENT_IDwith--assignee-object-id $ASSIGNEE_OBJECT_ID --assignee-principal-type ServicePrincipal.Create a Helm chart configuration file for ExternalDNS:
cat <<EOF > external-dns-values.yaml
serviceAccount:
  annotations:
    azure.workload.identity/client-id: "$USER_ASSIGNED_CLIENT_ID"
podLabels:
  azure.workload.identity/use: "true"
provider: azure-dns
txtPrefix: ext-dns-
txtOwnerId: "$AZ_AKS"
policy: sync
secretConfiguration:
  enabled: true
  mountPath: "/etc/kubernetes/"
  data:
    azure.json: |
      {
      "subscriptionId": "$SUBSCRIPTION_ID",
      "resourceGroup": "$AZ_RESOURCE_GROUP",
      "useWorkloadIdentityExtension": true
      }
EOF
Deploy the ExternalDNS Helm chart:
helm -n $SERVICE_ACCOUNT_NAMESPACE upgrade external-dns external-dns \
    --create-namespace --install --wait \
    --repo https://kubernetes-sigs.github.io/external-dns/ \
    -f external-dns-values.yaml
Verify the deployment by checking the status of the ExternalDNS pod:
kubectl -n external-dns get podYou should see output similar to this:
NAME                         READY   STATUS    RESTARTS   AGE
external-dns-85bcf75-7hn5j   1/1     Running   0          16s
From this point forward, any Ingress objects you create will automatically update your DNS zone.